Popular Posts

Sunday, 14 November 2010

Increase Security by Enabling Account Lockout in Windows 7

Although having separate Windows7 user accounts increases security, there are a few disadvantages to overcome when there are many user accounts associated with one computer. The most important of these disadvantages is that more accounts mean that a hacker has that many more opportunities to gain unauthorized access to thecomputer or server.
One way to combat this disadvantage is to enable certain account policies that automatically limit a hacker’s ability to gain access to a user’s account. Enabling account lockout policies is one of the most powerful ways to thwart thieves, hackers, and other people wanting to steal your files, personal information, or other sensitive information .

Why Enable Lockout Policies?

Enabling lockout policies helps prevent unauthorized use of someone’s Windows 7 account. Of course, it doesn’t completely prevent unauthorized access; it simply makes it much harder for someone to continually input password after password when trying to gain access to someone’s account.
In work environments, employees often share account information such as usernames and passwords. Often, one employee will try to use another employee’s account by guessing at the password. Some social engineers will try to gain as much information about a user’s password and then attempt an intelligent guessing attack by trying different combinations of a password on an account. For these reasons and others, it makes sense to enable an account lockout policy.

How to Enable Windows 7 Account Lockout Policies

There are three Windows 7 policies associated with account lockouts. To view the current settings for these polices, begin by logging into Windows 7 with an account that has administrative privileges. Then, click on Start>All Programs>Administrative Tools>Local Security Policy.
Click on Local Security Policy
In the left hand pane of the Local Security Policy window, locate and click on a folder titled Account Policies and then on the folder titled Account Lockout Policy.
Windows 7 Account Lockout Policy
Notice that there are only three policies located in the right hand pane. These are the policies that control account lockout. Right click on the policy titled Account Lockout Threshold and choose Properties from the menu. This policy is the one that enables account lockout and allows you to set values for the other two policies.
Account Lockout Threshold Policy
The Account Lockout Threshold is a security setting that determines the number of failed login attempts before that account is locked out. Possible values for this policy range from 0 to 999. A value of zero means that accounts are never locked out regardless of the number of failed login attempts.
Set this value to a reasonable number such as 5. You need to leave at least a few failed login attempts because of a misremembered password or because the user accidentally has Cap Locks on while attempting to login.
Click the OK button and notice that Windows 7 recommends you set the next two policies to 30 minutes each. Click the OK button and locate the next policy titledAccount Lockout Duration. Right click on it and select Properties from the menu.
Account Lockout Duration
Notice that Windows 7 has already set this policy to 30 minutes. This policy sets the number of minutes an account that has been locked out remains locked out before it is automatically unlocked.
30 Minute Account Lockout Duration
You can set the account lockout duration to any value between 0 and 99,999 as long as it is equal to or greater than the Reset Account Lockout Counter Afterpolicy. After setting the Account Lockout Duration variable, click OK and locate the policy titled Reset Account Lockout Counter After. Right click on this policy and select Properties from the menu.
Reset Account Lockout Counter After Policy
Notice, again, that Windows 7 has set this policy to a value of 30 minutes. TheReset Account Lockout Counter After policy sets the number of minutes that must elapse after failed login before the failed login counter resets back to zero. The value for this policy can be anything from 1 to 99,999 minutes but must be equal to or less than the value set for the Account Lockout Duration policy’s value.
30 Minute Reset Account Lockout Counter After Policy
Enabling the account lockout policies on your Windows 7 PC can increase security by reducing the number of times a user or an unauthorized individual can attempt to login to the computer.
However, setting the number of failed logins before lockout too low can increase administrative workload to the point of annoyance for both computer technicians and users. Be careful about the values you set for the three lockout polices to strike a balance between security and usability.

Increase Security by Enabling Account Lockout in Windows 7


Use Windows Firewall to Block Out All Incoming Connections to Windows 7

With breaches in home computer security at an all time high, it is no wonder why Microsoft built the Windows Firewall application right in to the last few versions of Windows.
Using Windows Firewall, you can lock out all incoming connections to maximize your computer’s security. This is especially useful when transporting your laptop from your home to a public Internet connection.

Why Lock Out All Incoming Connections?

Internet service providers (ISPs) such as Time Warner RoadRunner allow subscribers to stay connected to the web as long as the computer remains on. This is a great feature for fast internet access but can leave your computer open to attacks.
Windows Firewall is an application that plugs the holes in your network that don’t need to be open for you to connect to the Internet , to public networks, or to your home network. Using Windows Firewall in Windows 7, you can lock out all incoming connections, override any other network policies, and maximum the security of your PC.

How to Use Windows Firewall to Lock Out All Incoming Connections

Begin by clicking on Start>Control Panel>System and Security>Windows Firewall.
Open Windows Firewall Settings
You’ll notice that you can set options for two types of networks: Home/Private andPublic. This is where many people get confused about networks. You see, although your ISP  subscription allows you to connect beyond your home network to the web, your local area network (LAN) connection to the web is still considered a home/private network.
In Windows 7, private networks are those that take advantage of a homegroup. Public networks, such as when you connect to the web in a hotspot, in a coffee shop, etc., do not.
Therefore, you only need concern yourself with the Home/Private network for connections in the home and Public network when you connect to the web outside the home. To the left of the window, click on the link titled Turn windows firewall On or Off.
Turn Windows Firewall On or Off
You should now be looking at the Windows Firewall Customize Settings window. Notice that there are separate settings for the two types of networks:Home/Private and Public. If you are like more people, you have the setting titledTurn On Windows Firewall chosen for both types of network.
Windows Firewall Settings
Notice that under each type of network, there is an option labeled Block All Incoming Connections, Including Those in the List of Allowed Programs. Checking this option for either the Home or Public network type will block all incoming connections.
Note that this includes those connections that have already been approved in the list of allowed programs. Use this option with caution because you may disrupt connections necessary to do what you want to do on your networks.
There are a few good reasons to use this option. First, if you are connected an unfamiliar or unsecured network, you can temporarily use this option to protect yourself. When you disconnect from the network, you can uncheck this option.
Second, if you need to upgrade, uninstall, or install protection software such as an antivirus application, you can lock out all incoming connections to temporarily protect yourself until the installation is complete.
Finally, there may be times when you suspect that malware has been installed on your computer. To avoid any incoming communications until the problem is fixed, consider locking out all incoming connections to avoid adding more problems to the issue.

How to change the default location for installing applications in Windows

One way to do this is to install applications on a drive other than the drive where Windows is installed. So by default, most computers will have Windows installed on the C partition and most programs will be installed in C:\Program Files.
Of course, whenever you install an application, there are some system files that have to be installed into Windows directories on your C drive, but it still can take a major load off your Windows partition if you’re running very data intensive applications like Photoshop, video editing software, etc.
If you have a desktop computer, it might actually be much better because you could pop in a secondary drive that is much faster than the original drive. Also, you might be asking yourself “Well why would I change the path in the registry when I can choose the path I want to install to during the program setup?”
Good question! Well, for two reasons: some programs don’t give you an option of where to install the app to and sometimes you might just forget to change it manually.

How to change default install path for applications in Windows

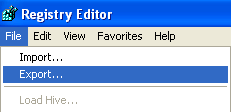
You can do this by making a quick change to the registry. Firstly, you’re going to want to make a backup of your registry before making any changes. You can back it up by opening the registry editor and choosing File and then Export.
export registry
To get into the registry, click on Start, then click on Run and type in regedit. In Windows Vista, just type in regedit into the instant search box and press Enter. Now navigate to the following key:
HKEY_LOCAL_MACHINE\SOFTWARE\Microsoft\Windows\CurrentVersion
Now look for a key in the right pane called ProgramFilesDir. You should see that the value is C:\Program Files.
programfilesdir
Now you can simply double-click on the value and edit it to whatever you like, i.e. “D:\My Apps\”. Whenever you install a new program, Windows will use the new location as the default installation directory. Nifty! Source: TechBold
[tags]change default installation directory, windows install path, change default install path[/tags]

Change yout IP address

How To: Change Your Ip In Less Then 1 Minute

1. Click on "Start" in the bottom left hand corner of screen
2. Click on "Run"
3. Type in "command" and hit ok

You should now be at an MSDOS prompt screen.

4. Type "ipconfig /release" just like that, and hit "enter"
5. Type "exit" and leave the prompt
6. Right-click on "Network Places" or "My Network Places" on your desktop.
7. Click on "properties"

You should now be on a screen with something titled "Local Area Connection", or something close to that, and, if you have a network hooked up, all of your other networks.

8. Right click on "Local Area Connection" and click "properties"
9. Double-click on the "Internet Protocol (TCP/IP)" from the list under the "General" tab
10. Click on "Use the following IP address" under the "General" tab
11. Create an IP address (It doesn't matter what it is. I just type 1 and 2 until i fill the area up).
12. Press "Tab" and it should automatically fill in the "Subnet Mask" section with default numbers.
13. Hit the "Ok" button here
14. Hit the "Ok" button again

You should now be back to the "Local Area Connection" screen.

15. Right-click back on "Local Area Connection" and go to properties again.
16. Go back to the "TCP/IP" settings
17. This time, select "Obtain an IP address automatically"
tongue.gif 18. Hit "Ok"
19. Hit "Ok" again
20. You now have a new IP address

With a little practice, you can easily get this process down to 15 seconds.

P.S:
This only changes your dynamic IP address, not your ISP/IP address. If you plan on hacking a website with this trick be extremely careful, because if they try a little, they can trace it back

Aerotuner fine tune aero theme settings in windows 7


AeroTuner is another excellent tool created by our friend "hb860". It allows you to tweak various Aero theme options which can't be customized by default.
With the help of this tool:
  • You can enable/disable transparency in windows.
  • You can customize color balance
  • You can customize after glow color balance
  • You can customize blur balance
  • You can customize Aero stripes
In other words, you can customize the whole Aero UI with this tool.
You can download it using following link: